
Tires are an issue for the Elan. Factory fitment for the first 3 generations is 145/80-13 and thanks to the mild flares in the S4, this was upped to a heady 155/80-13. Although wider tires will fit when narrower than stock springs are used like with my TTR suspension, classic Lotus tolerance issues means that what fits one car, may not work on another. And when you go too wide for a particular car, a mid-corner bump will create significant body damage.
Although wider sounds better, the reality is that only crappy All Season tires are generally available in Lotus sizes. The exception it the Michelin XAS and XAS FF. These are modern tires using the classic XAS tread and the FF designation means the substitution of a much stickier rubber compound. How sticky? Well, that's hard to say. Michelin doesn't publish a tread wear rating and wouldn't answer my question on that topic or identify the other tires in their range using that compound, but rumor says it's their R-compound. Based on reported wear rates from those using the tire, that sounds about right.
The downside to the XAS is weight. They aren't particularly light and they require heavy tubes. Compared to the tubeless, and very, very worn 165/70-13 Firestone M&S tires that came with my car, they are fully 4 lb heavier per corner. That's a lot, but it's not something felt when driving except through slightly weightier steering at high speed (not a bad thing). The ride is much better, and the handling is simply in a different league. The car now grips. A lot! They are also far more progressive and deliver better steering feel.
I also replaced the stock 11/16" front anti-roll bar with a 60% stiffer, tubular version from Kelvedon. It saves about 4 lb, and has reduced the body roll significantly. It still rolls more than my other cars, but not enough to hamper transitions.
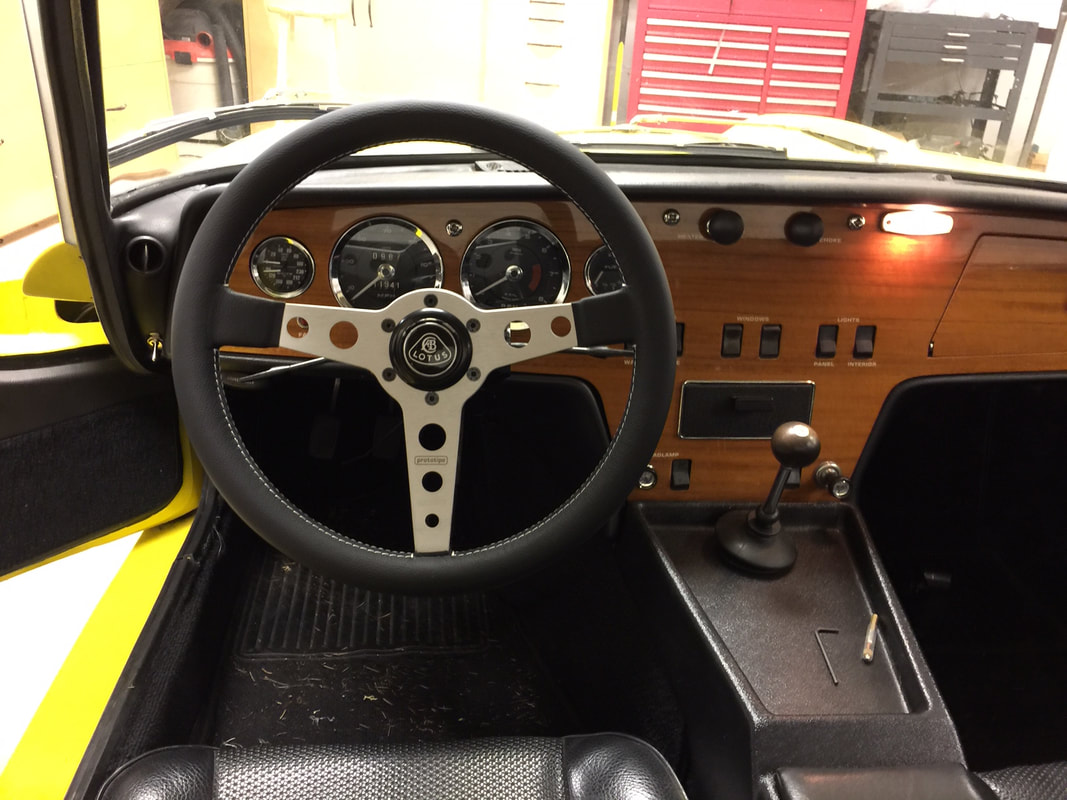
Last on the list was replacing the Lotus 26R style steering wheel with a Momo Prototipo. The 26R wheel is slightly smaller (13" vs. 13.75") which is preferred, but the rim was too skinny for my tastes, and I don't like a wheel without thumb padding on the spokes. Aesthetically, I also prefer the look of drilled spokes to the 26R's slotted spokes.
The handling experience is now pretty special. Great steering feel and it dives for an apex in a similar fashion to the Westfield; Chapman was right about the benefits of adding lightness.
Although wider sounds better, the reality is that only crappy All Season tires are generally available in Lotus sizes. The exception it the Michelin XAS and XAS FF. These are modern tires using the classic XAS tread and the FF designation means the substitution of a much stickier rubber compound. How sticky? Well, that's hard to say. Michelin doesn't publish a tread wear rating and wouldn't answer my question on that topic or identify the other tires in their range using that compound, but rumor says it's their R-compound. Based on reported wear rates from those using the tire, that sounds about right.
The downside to the XAS is weight. They aren't particularly light and they require heavy tubes. Compared to the tubeless, and very, very worn 165/70-13 Firestone M&S tires that came with my car, they are fully 4 lb heavier per corner. That's a lot, but it's not something felt when driving except through slightly weightier steering at high speed (not a bad thing). The ride is much better, and the handling is simply in a different league. The car now grips. A lot! They are also far more progressive and deliver better steering feel.
I also replaced the stock 11/16" front anti-roll bar with a 60% stiffer, tubular version from Kelvedon. It saves about 4 lb, and has reduced the body roll significantly. It still rolls more than my other cars, but not enough to hamper transitions.
Last on the list was replacing the Lotus 26R style steering wheel with a Momo Prototipo. The 26R wheel is slightly smaller (13" vs. 13.75") which is preferred, but the rim was too skinny for my tastes, and I don't like a wheel without thumb padding on the spokes. Aesthetically, I also prefer the look of drilled spokes to the 26R's slotted spokes.
The handling experience is now pretty special. Great steering feel and it dives for an apex in a similar fashion to the Westfield; Chapman was right about the benefits of adding lightness.
 RSS Feed
